Our FourSquare

Our FourSquare

Sunday, June 1, 2014

The Bathroom Painter


 Our painter showed up, armed with not just 1 but TWO paintbrushes, her painting clothes and a smile that brightens the universe!  She is highly skilled and I would recommend her to anyone.


Look at the wonderful technique!
We gave her a red solo cup with about 2 inches of paint in the bottom and this brush and she did quite a good job honestly - especially for a 2 year old.  I don't think she got any paint on her clothes.  She had a bit on her hands, but not very much!  Probably less than I.  She painted that whole wall up to where she could reach!
This is one of the items still left on the 2 page list...UGH!

This is now completed, but no pics yet. Stay tuned.

Love plastic with the tape attached!

From this pic you can see the exposed brick.  You can also see it in the picture of the painter, Emma.  At the base we are going to put back some plaster so the baseboard won't look odd.

This is the vanity mirror.  We added a door header as the base to extend the height of the mirror off the vanity (dresser). I think the finished project looks fantastic.  At first we thought about putting tile or a beveled mirror piece on the bottom of it - but I think I like it just fine without that.

The beginnings of the built-in for the main bath.

Tub/shower with its lovely new tile surround.  The tilers did an excellent job!  The shower curtain rod has been fabricated by Chuck. I love it!

With the Shower curtain - obviously, LOL

The Billings flea market baseboard.  Looks like it is close to original for the house.


And...the final look. Dresser/mirror - flea market - stripped of original veneer, new veneer glued in place, new knobs added (we have since put on glass knobs - I love these but they are shiny brass and I thought when I ordered them they were antique brass - perhaps there's a way to antique the brass), sink, faucet, door header, new wainscot, flea market baseboard and there you have it, easy peezy, lemon squeezy!


Some recent accomplishments...

Progress has been made.  Other than touch-up painting and adding some plaster back onto a small part of the brick outside wall - the main floor bath..... it's DONE!!!! Can I get a WOO F HOOOOOOOO?

Out of the whole house, that 6 x 12 foot room had the longest to-do list.  How does that happen?  To its defense, it's also the only room that will probably have had a full gut.

I'm not sure how I feel about the sink vanity. It's gorgeous, but I'm just worried how it will hold up to water. After putting 5 layers of poly on it with a light steel pad sanding in-between each, I'm hoping it's enough.  I found some poly meant for a more water use area. Is it too late to apply - or do we just wait until we need to redo the poly?


I think this is what we should have used - but I didn't know it existed until we had put the sink in.  We'll see. I really love the color and richness of Varathane products!!! Any thoughts about adding another coat now?

LIVING ROOM

We have almost finished the living room - temporarily. Temporarily as in - 2-20 years. Eventually we'll be stripping all the wood work and staining it. We still need to either find the fireplace mantel at a flea market/antique place or build it - I think the cost is going to be about the same either way we go.

We - I think we - I know I, and the DH seems to agree, wish to have a mantel that has columns like on the front porch of the house.  I found some columns at a flea market for roughly $14 and gosh - in the flea market they seemed the right diameter, then when you get things like that home - well they are a tad bigger than what they originally appeared.  I think they may work - OR - we'll find another use for them.

We built a faux fireplace area in the living room to conceal the air returns for the furnace and eventual AC. Eventual meaning at least by July.  Honestly though, I think the only time we'll use it is when the humidity is above 78 percent in the house and / or the temp is above 90 degrees.  Old houses were definitely built to cool themselves back in the day.  When you open the windows correctly it vents the hot air out and has a nice breeze drafting throughout the house. Last summer we found it uncomfortable only a few times.

Several weekends ago I washed down the entire living room--what a task---washing every inch of the walls and woodwork---.to prep it for new paint over who knows how many layers of previous paint and several layers of wallpapers as well. It looked better just having all the stain from tobacco and whatever else washed clean. I didn't want to do that in the beginning of this house adventure...but then I just needed a room that was presentable...a place to get out of all the restoration, mess, etc.  Possibly down the road that wallpaper/paint mess will be removed, but for now - flat paint is fabulous!!  It just seems to suck all the bad into the color and it disappears unless you look closely. DON'T LOOK CLOSELY!!!! Not nice!  The baseboard looks very nice -  all clean and shiny.  We've been using Valspar paint and using "historical colors". I have to wonder if these places really exist - but nevertheless - I like the colors!  The living room is Churchhill Hotel Vanilla.
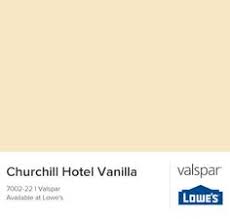
This probably doesn't look any thing close to what the paint actually looks like - but I can assure you it's beautiful! Think Vanilla Bean ice cream!!
It looks like a rich vanilla ice cream!

I love how it looks with the enamel trim and I think it will look just as good when we remove the paint and stain the wood a dark walnut or mahogany color.

**Side note: I looked up where the Historic colors come from - It's through the The National Trust for Historic Preservation
So here is the hotel that our lovely vanilla color was inspired by: The Churchill
And this is where our bathroom color comes from: Lyndhurst  Lyndhurst

Soooo, I guess that's for real - not just a ploy to cause me to buy their "Historic" paint colors.

Tuesday, February 4, 2014

Paint, stain, scrape, paint, caulk....

Let's talk about the paint.  We have chosen beige - what a fabulous color!  It turns grey, brown, tan. Love it!  Trying to decide on the type of paint - eggshell or satin.  It's for the bathroom.  I tend to be a lover of flat paint because it doesn't show issues.  The sample we purchased - that I had to mix myself because the woman in the Big Blue L store was apparently unable / unwilling to mix it.  So I shook that little container of paint from Monett to Aurora.  Finally the bottom of the container was the paint color instead of white.  I know I could have waited until we got home - but where's the fun in that? The samples are only sold in satin and I kinda liked the look of it.  I didn't take pictures of it yet, sorry.  What I've read says to use satin in the bathroom because it cleans up better, is more scrubbable.

It's called
Lyndhurst Gallery Beige
2006-10B
Valspar  It really doesn't seem that dark in reality.

We will be putting wainscot up and it will be a shade of cream/white.  It looks like it matches the tile - so hopefully that's the outcome. 

I can't wait until we can get this room finished!!  It's so close - bet yet the list is sooooooooo long.

Snow Day!!! Sans snow....so far any way.

An update of progress.

We are still working on the main floor bathroom.  The tile is finished, grout finished, dry wall finished - all but last sanding, sink plumbed- installed - removed for final staining of mirror frame, over-toilet-cabinet installed (needs to be scraped and repainted), bathroom cabinet partially completed, paint color chosen.

Several weeks ago I went through and made a list of everything that needs completed on the main floor with the exception of the kitchen - 3 pages long - rather overwhelming.  Oh well.  I guess I wished I'd stayed in the dark and kept thinking oh we just have a few more things to do. Eh - what's done is done....and what isn't - isn't.

We do probably have a better attack plan at this point and way to stay more on track. That's a plus!

Here's my take on drywall.  Hanging it - great workout - especially for muscles you're not currently introduced to.  You also learn to use your head as a arm/hand appendage.  Great stuff.

First round of mud and tape - hate it!!!  Probably due to wanting it to look perfect instead of changing my mindset to - umm - put it on - you're going to sand it off and then it will look fine! 

Second round of mud - ok - I like this stage - rather artistic - you can see what it's going to be.

Third coat - walk away - don't touch it, quit messing with it.

Then it became rather addictive and I started mudding things that didn't need mudded because it made it look like PLASTER!!!!  Ahhhhhhhhhhhhhh - it's beautiful!!!!

Can't wait to get back to it so we can do the final sanding and paint.
Yeah!

Tuesday, October 1, 2013

Let the tiling begin...after the stud additions, leveling of this and that, and so on...

Yikes! There's lots to accomplish before you can add tile - including gaining knowledge and nerve.

First, studs had to be added because the PO didn't believe in 16" centers apparently.

Then we had to get them level - shimming, unshimming and so on.

And so this is how we finally got the tub to be level----shhhhhhhh - don't tell!


Love the Kerdi!  It really is a great project - but you have to be FAST!!!!!  We did wet down both the drywall and CBB, but it still dried quickly.


Next, drywall, cement backer board - what??? drywall behind a shower - that's what Kerdi says - the orange water proof
membrane we installed - after putting up the drywall and cement backer board.


Here is the making of the story stick - so we could see where the tiles would lay out.


And this is another way to see how the tiles lay out - this is Chuck's preference so he can just SEE IT!!!  If you look closely there's our planned for niche - It was gonna be so cool!  We just felt we weren't at this leveling of tiling or Kerdi waterproofing to do this yet - maybe upstairs.
The installation of the bathroom exhaust fan.  Fun Stuff!
According to Schluter-Kerdi we could have put drywall behind all of it, but we had already purchased the CBB and so we decided to use some of each - mix it up a bit.

Then there was the stress of - do we put in a niche or do we not - after much "debate" over how to do it, we opted for no niche - you know they make some lovely shower organizers these days that will work just fine.  A niche would be nice - but not this time.

So the Kerdi is up - wait a week or 2 or .... maybe it was 4 or 5 and we finally decided tiling time had arrived!!  Woot Woot

It was a learning experience - but overall I think it turned out ok.  I do want to give a big thanks!!! to the humans on the John Bridge Tile Forum who helped get me headed in the right direction and feeling like I could do it and helping me figure out which thinset to use.
 
Putting up mosaic on mesh backing is not near as easy as they make it look on TV!!
 
 
I do really like these spacers!  Pretty easy to use and easy to remove - for the most part!

Sunday, September 29, 2013

Main Floor bath remodel continued...

Here is what vinyl flooring can do...


 And these are the 2 lovely ladies that keep us going on the remodeling projects!  We can't wait until you can come and stay with us.


 Will continue later...


BEFORE PICS Bathroom remodel in progress...

It's been a long time since I've updated.  Sorry.  I put in photos from all that as well.  On to the mainfloor bath remodel.

To date we have:
Installed new water lines, new toilet with all that goes with it, replaced the floor under the toilet and tub, pulled up all the vinyl tiles from the floor, took down all the plaster - then we decided the lath had to go to.  We have installed new drywall - both white and purple (blue) - it looks purple to me.  Let's take a look.

  We think there used to be a sink where it is a beige color.

 Ooooooooooweeeee GROSSNESS!  It's pulled and cleaned.  Would you like to purchase?

  Make sure your caulk is in good repair!

  See what I mean - who knows what all is growing there!

 Gone!